| Fun Facts About Me |
| - I sleep with at least a foot or hand dangling off the bed. - My favorite color is teal. - I have 3 beauty marks: cheek, back, lower cheek. - I like Kraft mac & cheese and hot cocoa on cold days. - I love old romantic comedy musicals. - I have big feet. 
|
| P'an-Chin-Lien |
| The Chinese Goddess of prostitutes. As a mortal, she was a widow who was much too liberal and inventive with her favors, and her father-in-law killed her. In death she was honored by her more professional associates and eventually became the goddess of whores. |
| Baklava Cups |
1 (2 1/8oz) box frozen miniature phyllo cups
2/3 c. chopped mixed nuts
1-2 tsp. sugar
1/4 c. honey
1 tsp. water1. Preheat the oven to 350 degrees.
2. Place the shells on a baking sheet. Mix the sugar and chopped nuts and fill the shells. Bake for 8 minutes or until the shells are lightly browned.
3. Mix the honey and water in a small bowl and drizzle over the nuts. Serve warm or at room temperature. |
| Kujiga: Korean Chant |
| Song sung by the nine elders of Kaya when summoning King Suro. One of the earliest (if not the first) recorded instance of a shamanistic ritual (kut) in Korea. Keobuga, Keobuga
Meorireul naeeora
Naeeonoch'i aneumyeon
Kuweo meogeuri
"Turtle, Turtle
Stick out your head
If you don't
We'll roast and eat you" |
| Cortigiana Onesta |
| In Italy, known as honest courtesans, the cortigiana onesta were usually well-educated and worldly (sometimes even more so than the average upper-class woman), and often held simultaneous careers as performers or artists. They were typically chosen on the basis of their "breeding"--social and conversational skills, intelligence, common sense, and companionship--as well as their physical attributes. It was usually their wit and personality that set them apart from regular women. They were prostitutes in the sense that sex was one of their obligations, but unlike the average prostitute, sex constituted only a facet of the courtesan's array of services. For example, they were expected to be well-dressed and ready to engage in a variety of topics ranging from art to music to politics. |
|
|
| Monday, October 12, 2009 |
| How to Bypass a Ducati Monster Kickstand Cutoff |
Apparently Ducati thinks that it's perfectly reasonable to have a rider sit on their bike, twiddling their thumbs, for the eternity it takes to warm the bike up. Since I think I could better spend that time putting on my gear, closing my gate/garage door, or anything else I did a bypass for the kickstand cutoff.
Now, the easiest thing would be to disconnect or jumper the kickstand so the bike thinks it's always down. The downside to this is user error. I'm not a morning person and I'm guilty of trying to ride off with my kickstand down. This inevitably results in that heart-stopping moment when the stand hits the ground. If you're lucky (90% of the time) the stand will pop right up and out of the way. But you can't be lucky all the time and eventually that stand will bite the ground and send you cartwheeling through space.
The glory of this bypass is it's built-in safety. If the stand is down and the bike's in neutral, it will start. If the stand is down and you pop the bike into gear, the engine will turn off. No more riding away with your stand down!!
My method was cobbled togethor using what I could find on the Ducati Monster Forum. Unfortunately the pictures/diagrams I hoped to find had long since expired so I did this. Enjoy.
-------------------------------------------------------------------------------------------
What You Need:
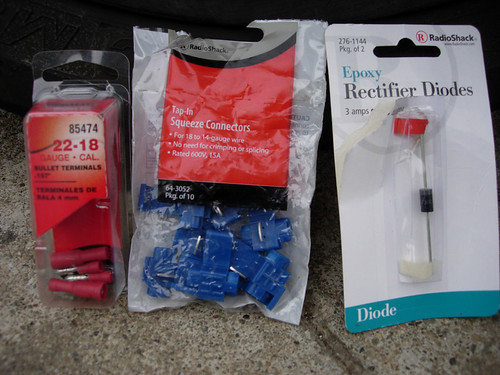
Left to Right: Some sort of quick connectors (it really doesn't matter what kind, I had these lying around from a turn signal swap), these squeeze connectors allow you to tap an electrical line without having to cut anything (18 - 14 gauge should work with Monsters), 3amp barrel diode (MUST HAVE).
Not seen: an extra couple of feet of 18 - 14 gauge wiring (better too much than too little)

Left to Right: Needlenose pliers; wirestripper (I couldn't find mine so I used a knife), wire cutter (the ones on my pliers were dull), heatshrink tubing (not necessary, but awesome)
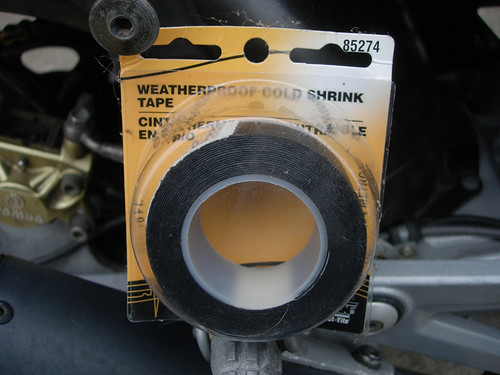
Cold wrap: like electrical tape, but extra stretchy and sticks to itself wonderfully!
Tap the Kickstand:

From the left side of the bike: look at the top of the kickstand and you'll see a little wire coming from it, moving towards the front and up along the engine inside the frame. This line ends in a weatherpack/connector thingy.
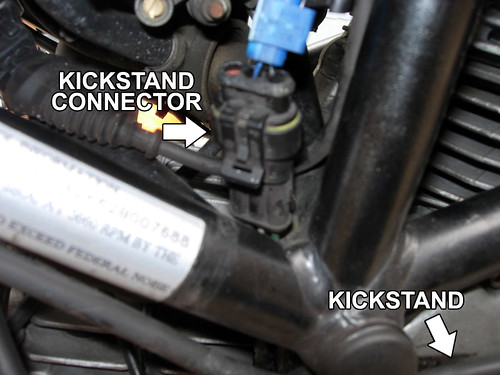
Here's a closeup of the weatherpack/connector thingy. (I've already added the splicing connector in this pic)
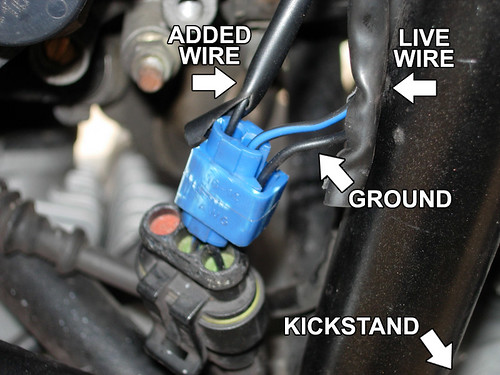
If you look at the splicing connector, you'll see that it has two "channels" in it: on that runs all the way through and one that has a little barrier. On my bike the ground is black and the live wire is green/black. Run the live wire through the channel that runs completely through. Now close the connector LIGHTLY and push your added wire into the channel with the barrier. It should be in far enough so when you close the splicer all the way the knife/fork thing contacts the added wire, thus making a connection. Because the splicer had a hinged door that secured the splicer, i just ran the ground cord in the hing so it would all be a tidy package. Ignore the ground.
I ran my added wire up (inside the frame) between the airbox and the battery. You can run it however you wish.
-------------------------------------------------------------------------------------------
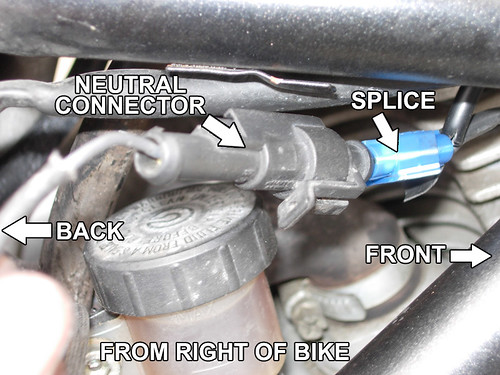
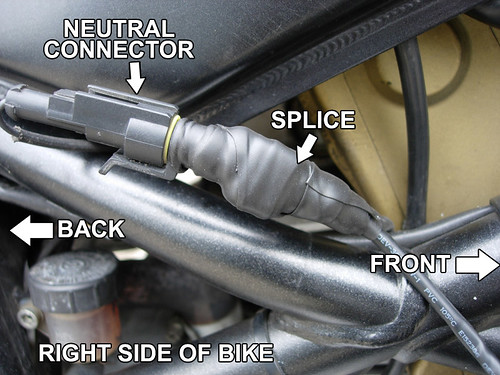
Splice the Neutral:
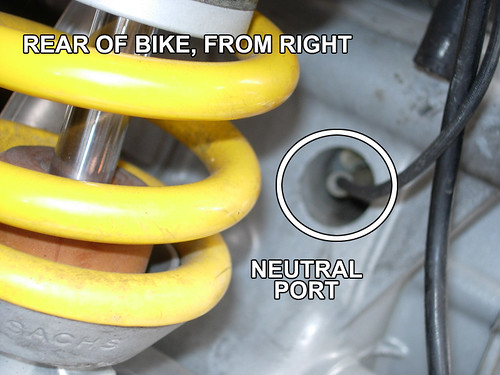
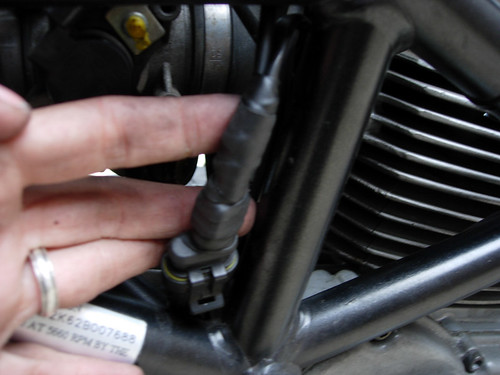
Now go to the right side of the bike and look behind the rear wheel at the engine. You'll see the port for neutral. Follow the line from it and you'll find another little weatherpack/connector thing. Mine was attached to my frame.
It's smaller than the one for the kickstand and only has one wire going into and out of it.
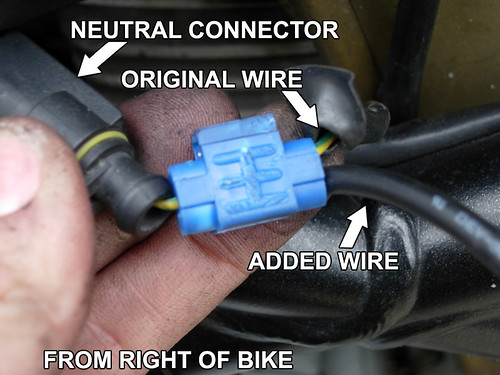
Do the same splicing thing here using the other end of the wire that you threaded through. I have lots of wire so I gave myself a LOT of slack to work.
-------------------------------------------------------------------------------------------
Fun with Diodes:
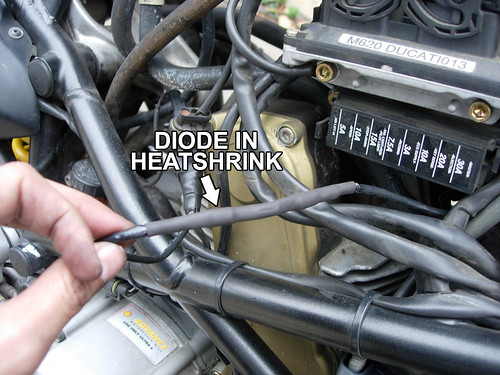
Snip the wire you threaded through the engine in a way that will allow it to be nestled back in without having to bend the diode part we're about to make. Since I threaded mine between the airbox and battery I made my snip about 3 inches from where it emerged on the right side of the bike. This allows the diode part to be nestled against the battery area under the tank.
Now strip an inch or so of the wiring from the kickstand half of the wire.
Note: I'm not going to pretend that I know what a diode does and, truthfully, I'm not finding myself caring too much. The diodes come with extra long wire thingies coming from their ends. You'll want to trim these so they'll make a solid connection inside the terminals, but not so long there's an excess. When I put mine on I could see the end of the diode's snipped wires in the channel of the terminal. I threaded the diode-wires into the terminals and used the pliers to squeeze the hell out of the openings to make a solid connection (ie: I gave tugs and wiggles and the diode didn't slip out).
Double note: It doesn't really matter if you use the male or female parts for the diode. Heck, you don't have to use them at all (just wrap the stripped part of your wiring around the diode-wires, solder, then wrap in tape). The reason I used the terminal connectors is because I heard that sometimes the diodes dies (some say 3 months, others say 3 years) and I wanted to be able to swap mine out easily.
I used the male connectors for the diode. I then attached the female connectors to the wiring. I left myself enough wiring so I could work easily and have some spare in case I messed up and had to cut off a few inches to start over.

This is what it looked like afterwards. Make sure the gray end of the diode is pointing towards the neutral port.
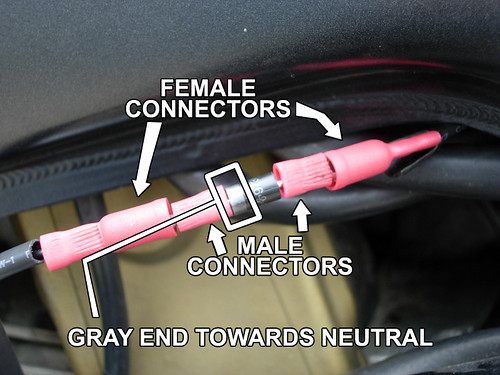
Here it is all plugged together.
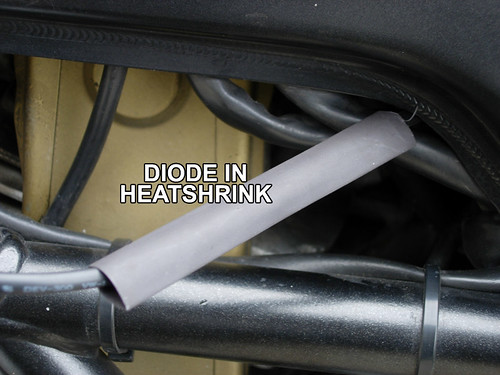
And with the heatshrink tubing. My tubing was too big so ended up a bit loose.
And heatshrunk down (notice it's not a tight shrink)

So, because the ends weren't weathertight, I added the trusty coldseal tape.
-------------------------------------------------------------------------------------------
Tape and Paranoia:
I'm a spaz when I wash my bike. The pressure's too high and I end up pointing the hose every which way. Therefore I want to make sure my weatherproofing is extra thorough to combat my stupidity.
From the kickstand
From the neutral connector
For added protection I got some tiny, black zipties and zipped the ends of the tape down so they won't unravel.
Afterwards it's just a matter of tucking in the wiring and ziptieing down wherever it's needed.
-------------------------------------------------------------------------------------------
Because I had some of this stuff lying around my immediate out-of-pocket for this was about $10 USD.
There's a bunch of kits available from $20 - $40 but I;m a cheapskate.
EnjoyLabels: bypass, cutoff, ducati, kickstand, monster, sidestand |
posted by Coddswaddle @ 10:18 PM   |
|
|
|
|
| About Me |
|

Name: Coddswaddle
High Priestess of the Dark Lord Internet
About Me: I was hatched long ago by a slightly neurotic squirrel. It was from that rodent that I cultivated an interest in shiny objects and innovative design. Marketing is a trial for me as I navigate the aisles of plastic-wrapped promotional products. At home I like to shoot aliens while smack-talking, cuddling my cats, and causing my fiancée grief.
See my complete profile
|
| Previous Post |
|
| Archives |
|
|
| Links |
|
Art/Design
Knowledge
Fun
Misc
|
| Template By |

They're Great!
|
| RSS Feeds |


|
|

